Installing an Aluminium Canopy is an effective way to enhance outdoor living, improve shelter around entrances and patios, and add a contemporary architectural feature to your home.
Whether you are planning a patio cover, entrance canopy, or carport, understanding the installation process can help you prepare and ensure a smooth experience.
Aluminium canopy systems are designed for efficient installation while maintaining structural integrity and a refined appearance.
To see completed installations across different property styles, you can browse the Gallery or visit the Showroom.
Understanding the Process of Installing an Aluminium Canopy
When exploring Installing an Aluminium Canopy, it’s useful to understand the typical stages involved. While each project may vary depending on design and site conditions, most installations follow a structured sequence from planning through to completion.
If you have initial questions about canopy design or preparation, the FAQs page provides helpful guidance.
Step 1: Planning and Design Considerations
Successful installation begins with careful planning. Determining canopy size, position, and intended use helps ensure the finished structure meets expectations.
- Define the purpose of the canopy space
- Assess available area and surrounding features
- Consider sunlight orientation and exposure
- Review roof material preferences
- Ensure alignment with architectural elements
Viewing real installations in the Gallery can provide inspiration during this stage.
Step 2: Measuring and Specification
Accurate measurement is essential when Installing an Aluminium Canopy. This stage ensures the canopy integrates correctly with the property and provides adequate coverage.
- Confirm width and projection requirements
- Assess fixing locations on the building
- Evaluate ground conditions for support posts
- Consider drainage routes
Made-to-measure designs help ensure a tailored fit.
Step 3: Preparing the Installation Area
Preparing the site helps streamline the installation process. Clearing the area and ensuring suitable surfaces are available can support efficient work.
- Remove furniture and obstacles
- Ensure adequate access for installers
- Confirm suitable base for support posts
- Check wall surfaces for fixing suitability
This preparation contributes to a smoother experience when Installing an Aluminium Canopy.
Step 4: Structural Framework Installation
The installation typically begins with positioning and securing the aluminium framework. This stage establishes the structural foundation of the canopy.
- Fixing wall-mounted support profiles
- Positioning vertical support posts
- Aligning structural beams
- Confirming level and alignment
Precision at this stage helps ensure stability and visual consistency.
Step 5: Roof Panel Installation
Once the framework is secured, roofing panels are installed. This stage completes the sheltered element of the canopy.
Glass Roof Installation
- Positioning glazed panels
- Securing glazing systems
- Ensuring alignment and seal integrity
- Maintaining visual clarity and finish
Polycarbonate Roof Installation
- Installing panel sections
- Securing edge and joining components
- Confirming drainage pathways
- Achieving consistent panel positioning
To compare roofing materials in person, visiting the Showroom can be beneficial.
Step 6: Drainage Integration
Effective drainage is a key component when Installing an Aluminium Canopy. Integrated guttering and downpipes help manage rainwater efficiently.
- Connecting gutter profiles
- Installing downpipes
- Confirming water flow direction
- Ensuring tidy integration with the property
Proper drainage supports both performance and appearance.
Step 7: Optional Lighting and Heating Installation
Many canopy installations include optional upgrades that enhance usability and atmosphere.
Lighting Integration
- Installing integrated LED systems
- Positioning fixtures for optimal coverage
- Enhancing evening usability
- Creating ambient outdoor environments
Heating Integration
- Positioning heating units
- Supporting cooler-weather use
- Enhancing comfort beneath the canopy
- Extending seasonal usability
For guidance on optional features, see the FAQs.
Step 8: Final Inspection and Finishing
The final stage of Installing an Aluminium Canopy involves inspection and finishing touches to ensure quality and functionality.
- Checking structural stability
- Confirming roof panel positioning
- Testing drainage performance
- Cleaning and presentation of the canopy
This step ensures the canopy is ready for everyday use.
Benefits of Professional Installation
Professional installation can provide reassurance that structural, aesthetic, and performance standards are met. Experienced installers help ensure accurate positioning and efficient completion.
- Precision fitting and alignment
- Efficient project completion
- Confidence in structural integrity
- Support for optional feature integration
These advantages contribute to a positive experience when Installing an Aluminium Canopy.
Planning Your Aluminium Canopy Installation
If you are preparing to move forward with your project, understanding the ordering and installation journey can be helpful.
The Ordering page outlines the typical process from enquiry through to installation.
Long-Term Confidence and Guarantees
Aluminium canopy systems are designed for durability and long-term outdoor performance. Understanding product coverage can provide additional reassurance following installation.
Coverage details can be reviewed on the 10 Year Guarantee page.
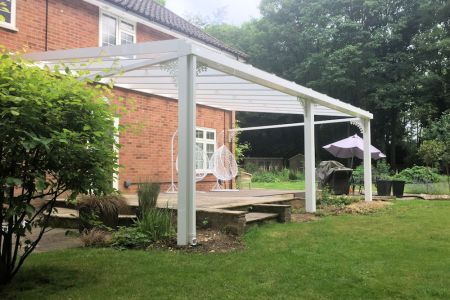
Seeing Aluminium Canopy Installations in Real Homes
Viewing completed projects can help homeowners understand canopy proportions, installation outcomes, and design integration.
To gather inspiration, browse the Gallery and visit the Showroom.